Introduction to PyCharm
Table of Contents
Introduction
PyCharm is a fully featured Python IDE. Why use PyCharm, or let alone and IDE, for writing Python code? To quote the PyCharm website:
PyCharm knows everything about your code. Rely on it for intelligent code completion, on-the-fly error checking and quick-fixes, easy project navigation, and much more.
In my experience, PyCharm makes it easy to write code, debug code, and improve your code quality.
Topics we’ll cover
After setting up a development environment on Kapteyn machines, we’ll mostly follow the official quickstart guide and cover the following topics:
Running code
Code navigation
Code completion
Code inspections
Git integration
Code debugging (time permitting)
Setup
Setting up a PyCharm project is not very difficult, but not very straightforward either. If you could do this beforehand, that’d be great :).
Configure Conda
Conda is the package manager that comes with Anaconda. We will be using Conda to create development environments for PyCharm. The latest Anaconda distribution is installed on Kapteyn machines. In order to configure Conda to create environments in your home directory, do the following:
$ module load anaconda3/2019.10
$ conda config --add pkgs_dirs ~/.conda/pkgs
$ conda config --add envs_dirs ~/.conda/envs
$ conda init bash
Create a first project
First of all, fire up PyCharm:
Start up PyCharm, either via the terminal (the program is called
pycharm) or via the application launcher (Applications -> Programming -> PyCharm).Click through the initial settings wizard if this is the first time you’re running PyCharm. Don’t create a launcher script if you’re on a Kapteyn machine.
New project with a new interpreter
We’re now ready to create our first project. We will do so with a new interpreter, but you can also point it to the existing Anaconda 2019.10 distribution.
In the PyCharm opening screen, select Create New Project, and enter the following (see Fig. 1):
Location:
~/PyCharmProjects/bytes-n-biscuits-projectNew environment using
CondaLocation:
~/.conda/envs/bytes-n-biscuits-projectPython version:
3.7Conda executable:
/Software/users/modules/7/software/anaconda3/2019.10/condabin/conda
This will create a new Conda environment with just Python 3.7 installed in it. We will install more packages later on.
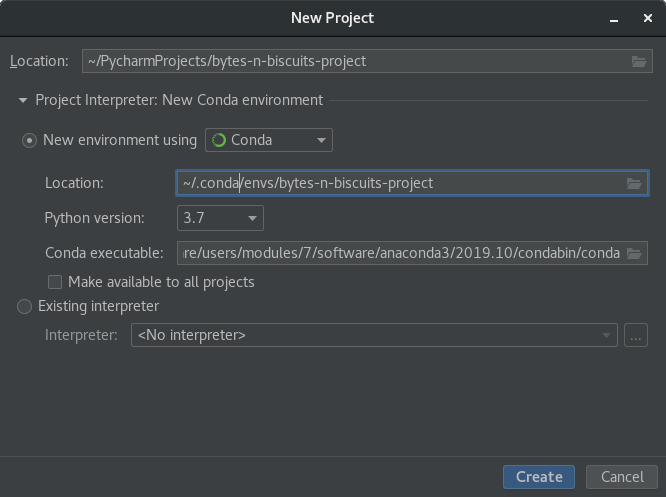
Fig. 1 New project with new interpreter dialog
Warning
Setting the interpreter to a newly created Conda environment might fail due to a bug in PyCharm. The error message will be of the form Directory <path of Conda env>/bin/python not found. To fix this,
Go to File -> Settings -> Project -> Project Interpreter,
Click the cog wheel (settings icon) next to the
<No interpreter>dropdown,Click Add.
Select Conda Environment -> Existing environment,
The Conda environment that was created for the project should be listed there. Select it and click OK.
New project using Anaconda 2019.10 as an interpreter
Alternatively, it is also possible to create a project that uses the full Anaconda distribution as an interpreter:
Select Existing interpreter in the New Project dialog, and click the
...button (see Fig. 2).Select Conda Environment, and enter the following (see Fig. 3):
Interpreter:
/Software/users/modules/7/software/anaconda3/2019.10/bin/pythonConda executable:
/Software/users/modules/7/software/anaconda3/2019.10/bin/condaCheck
Make available to all projects
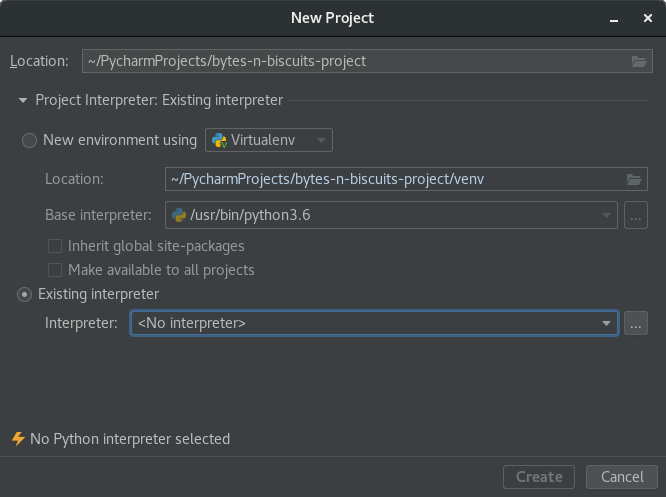
Fig. 2 New project existing interpreter dialog
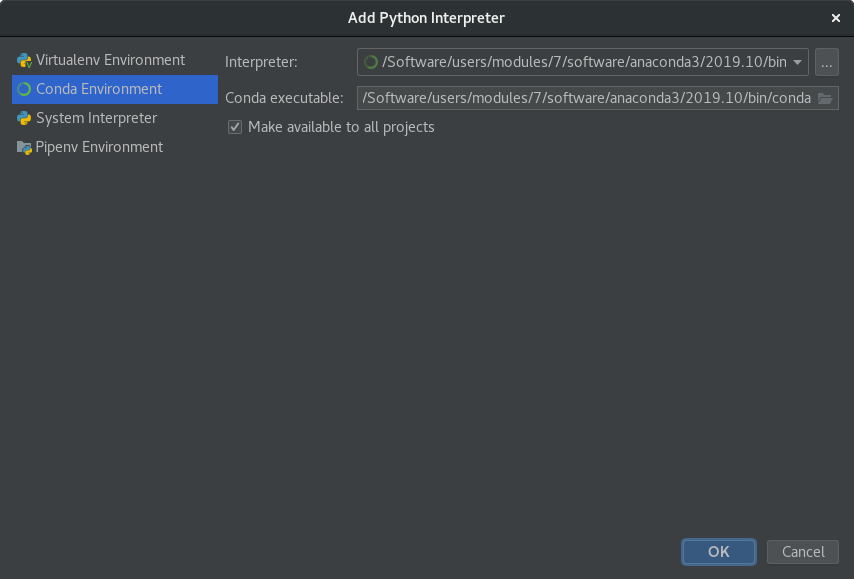
Fig. 3 Add existing Conda environment dialog
The benefit of using the Anaconda distribution over a new environment is that it comes pre-installed with probably all the Python packages you’ll need. However, it is read-only, so you cannot install new packages into it.
Note
The initial indexing of the full Anaconda distribution by PyCharm will take about five minutes to complete!
Performance tips
PyCharm indexes all the files of the Python interpreter and also all the files in the project folder. The default location of the PyCharm index cache is in your home folder. Thus the indexing can cause a lot of read / write operations over the network, since your home folder on Kapteyn is on a network share).
I therefore recommend to move the PyCharm configuration directory to the local hard drive of your usual Kapteyn workstation. To do so, follow these steps:
Run PyCharm at least once, and exit it.
Enter the following command in a terminal:
$ mv ~/.PyCharmCE2019.3 /net/<MACHINE_NAME>/data/users/<USER_NAME>/
$ ln -s /net/<MACHINE_NAME>/data/users/<USER_NAME>/.PyCharmCE2019.3 ~/.PyCharmCE2019.3
Note
For different PyCharm versions, the configuration directory will have a different name. The current version at the time of writing is 2019.3.
In addition to moving the PyCharm configuration directory, it is also worthwhile
to put the actual project and the project interpreter under
/net/<MACHINE_NAME>/data/users/<USER_NAME>/.
Tip
Accessing the local drive over the network interface via /net/<MACHINE_NAME>
incurs a small performance penalty when working on the Kapteyn machine whose name
is MACHINE_NAME, but makes it portable to other machines as well.
If you’re sure you’ll only use PyCharm on your own workstation, you can omit
the /net/<MACHINE_NAME> prefix in the above to avoid the perfomance penalty.